MQTT Cloud Profile: AWS IoT
This chapter describes the additional "AWS" tab in the MQTT plug-in. All general MQTT settings (default profile) can be found under MQTT Plug-in Configuration.
Principle: The AWS tab supplements the standard configuration with fields for the endpoint and client certificates. The remaining tabs (Connection settings, Storage, First Will, Last Will, Advanced) are configured as in the standard profile.
AWS
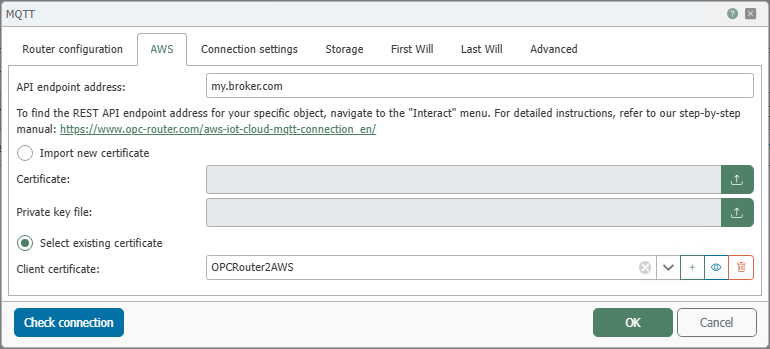
| Field | Description |
|---|---|
| API Endpoint Address | REST API endpoint of the AWS IoT object (Thing). You can find the value in AWS IoT under Manage → Things → (Your Thing) → Interact. |
| Import New Certificate | Imports a new client certificate with the associated private key into the OPC Router’s certificate management. |
| Certificate | File selection for the device certificate (*.crt / *.pem). |
| Private key | File selection for the private key (*.key). |
| Select existing certificate | Uses a previously imported client certificate from the certificate management. |
| Client certificate | Select the client certificate to use (or Without). |
| Test connection | Tests the connection using the currently set values. |
The link in the dialog leads directly to the Knowledge Base article. In AWS IoT, you can find the API endpoint on the Interact page of the selected thing.
Prerequisites in AWS IoT Core
- Create a Thing: Manage → Things → Create things → Create single thing and name the device.
- Create a client certificate: Security → Certificates → Create → One-click certificate creation. Then download the device certificate (PEM/CRT) and private key.
- Activate certificate: Activate the newly created certificate before using it for the MQTT connection.
- Create and assign policy: Security → Policies → Create a policy and assign it to the certificate. A very broad permission such as
iot:*set to*is suitable only for isolated test environments. - Assign certificate to the Thing: Assign the certificate to the created Thing. This is recommended for proper device management and is particularly important when working with thing-specific policies or device assignments.
The exact policy should align with your security concept. Restrict actions/ARNs as much as possible.
Managing Certificates in the OPC Router
- Import Certificate: Tools → Settings → Certificate Management → Client Certificates → Import.
- Assign Private Key: Select the imported certificate → Add Private Key → Select KEY file.
- Verify certificate: Check the display in the certificate list.
Configuration in the MQTT Plug-in (AWS tab)
-
Open Plug-ins → MQTT and create/edit an MQTT connection.
-
Router settings: Assign a name, select Cloud profile: AWS.
-
AWS:
- Enter the API endpoint address (copied from Interact).
- Select Use existing certificate or use Import new certificate and specify the certificate + key. (The latter is only necessary if you skipped the previous step to import the certificate via the OPC Router’s certificate management.)
- Run Test Connection.
-
Connection Options / First Will / Last Will / Advanced: Configure as needed (as in the default profile).
-
Save with OK.
Typical Settings / Notes
- Port & TLS: AWS IoT uses TLS. In Connection settings, Enable TLS/SSL should be active (default value).
- Client ID: Use placeholders for parallel instances (e.g.,
${hostname}-#[RAND:8]-#[INSTANCE:3]). - QoS: See MQTT Performance for effects on latency and execution time.
- Storage: To query the last stored value, enable MQTT Data Storage and define the desired topic patterns. Data is read via the MQTT Storage Read Transfer Object.
Troubleshooting
| Symptom | Cause / Solution |
|---|---|
| Handshake/Authentication failed | Certificate/key not imported correctly or incorrect certificate selected. Check certificate management and re-import if necessary. |
| Access denied | The policy is missing, too restrictive, or not assigned to the certificate being used. In AWS IoT, go to Security → Policies to check if a suitable policy exists and has been assigned to the certificate. |
| No route to host / Timeout | Endpoint incorrect, port/firewall blocked, or TLS disabled. Copy the endpoint again from Interact; check TLS/port. |
| Duplicate Client ID | Multiple instances with the same Client ID. Use a placeholder or Random. |
See also
- Main configuration: MQTT Plug-in Configuration
- Performance/RTT/QoS: MQTT Performance
- Reading from the OPC Router's internal MQTT storage: MQTT Storage Read Transfer Object