Notification Group
Under the menu item Tools - Settings, you'll find the Notification section below the button for Basic Settings.
Email notifications can be used for the following scenarios:
- Transfer errors
- Plug-in errors, plug-in restored
- Connection errors (plug-in/trigger error)
- Service stopped/started
Here, you can enter all the notification details and select the events from the list for which the notification should apply. You can also assign a name to the notification via the settings. To do so, click the pencil button. To rename an existing notification, click the plus sign. Use the On/Off toggle switch next to it to enable or disable the notification.
If you want to create more than one notification group, you’ll need an Enterprise+ add-on license. For more information on license assignment and other Enterprise+ features, see License Levels.
Please note that the escalation levels in OPC Router may cause status logging to stop. In this case, notifications can no longer be sent via email.
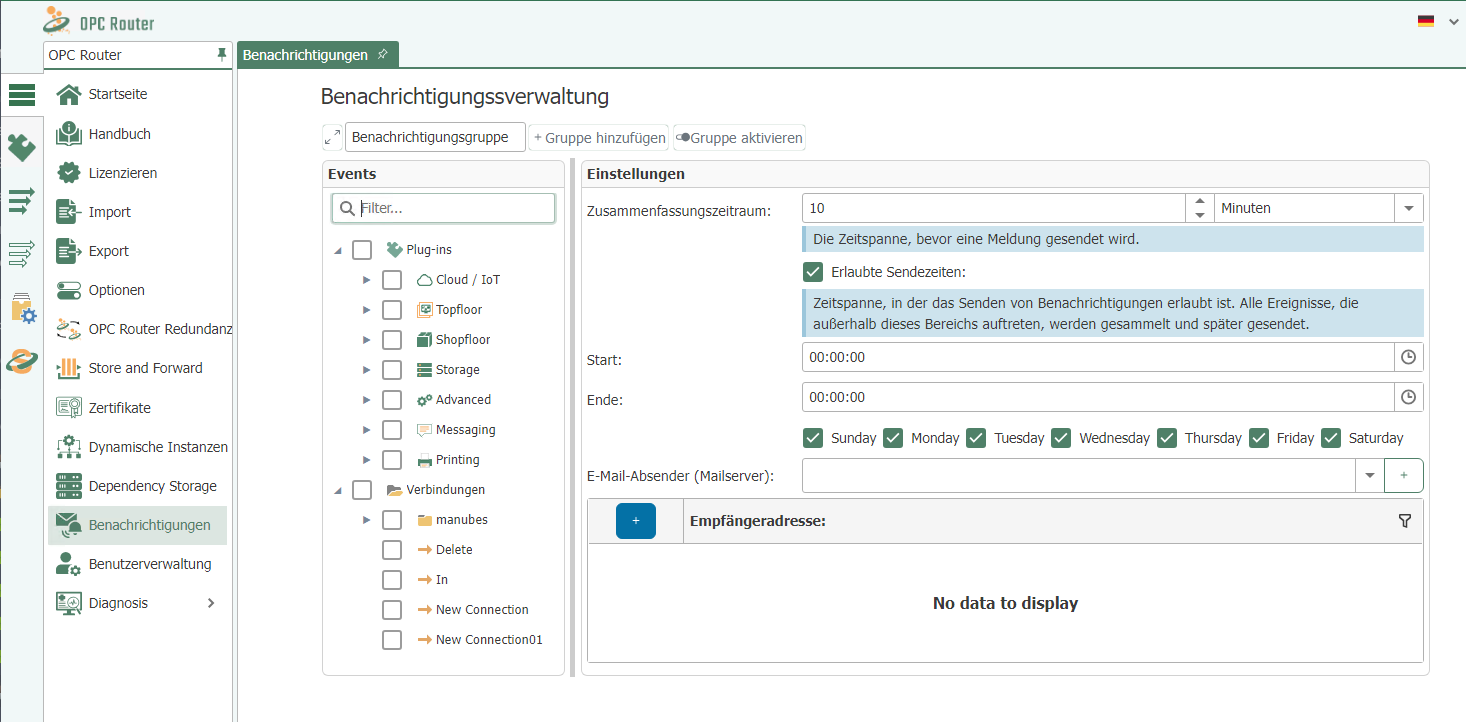
Settings
| Property | Description |
|---|---|
| Summary Period | The time interval before a notification is sent. |
| Allowed Sending Times | The time period during which messages may be sent. Events occurring outside this range are collected and sent later. To configure this, enter a start and end time and, if necessary, select a weekday by checking the corresponding checkbox. |
| Email Sender (Mail Server) | Select a mail server from the drop-down menu as the sender. To add a mail server, click the button with the plus sign and configure the settings. To edit or delete a mail server, select the corresponding buttons. |
| Recipients | Enter the recipients who should receive this notification here. |
Email Sender Name
| Property | Description |
|---|---|
| Name | Give the email notification a name. |
SMTP Server
| Property | Description |
|---|---|
| Server | Name of the server. |
| Port | Port on the server used for email traffic. |
| Use Secure Socket Layer (SSL) | Uses SSL encryption. The server must support this, and the corresponding port must be configured. |
| Windows Authentication | Uses the Windows account of the router service instead of a username and password. By default, this is “System”. Notes on configuring Windows user accounts for the OPC Router. |
| Username | Username for logging in to the server (SMTP or NT authentication). |
| Password | Password for logging in to the server (SMTP or NT authentication). |
| Domain | Domain where the user is registered. (For logging in to the server via NT authentication). |
Email Settings
| Property | Description |
|---|---|
| Sender | Enter the sender’s email address. The sender’s address must be in the format of an email address (name@example.com). |
| Subject | Enter a subject for your notification. A maximum of 255 characters is allowed. |
| Header | Advanced header entry is possible. |
| Language | Select a language from the drop-down menu. |
| Time Zone | Select a time zone from the drop-down menu |
| Send in HTML Format | Check this box if you want to send the notification in HTML format. |
Included Reports
| Property | Description |
|---|---|
| PDF file | Check this box if you want to send a PDF file. |
| CSV file | Check this box if you want to send a CSV file. |
| XLSX file | Check this box if you want to send an XLSX file. |
Use the “Test” button to check whether the server connection is working.
Confirm your entries by clicking “OK.”
Newly created and edited notification groups must be published before they become active.