Creating Templates
The following example assumes that the OPC server and database are correctly connected in the plug-in area. The goal is to create a template from which you can later generate multiple instances. In this example, a single template variable is sufficient to capture the data.
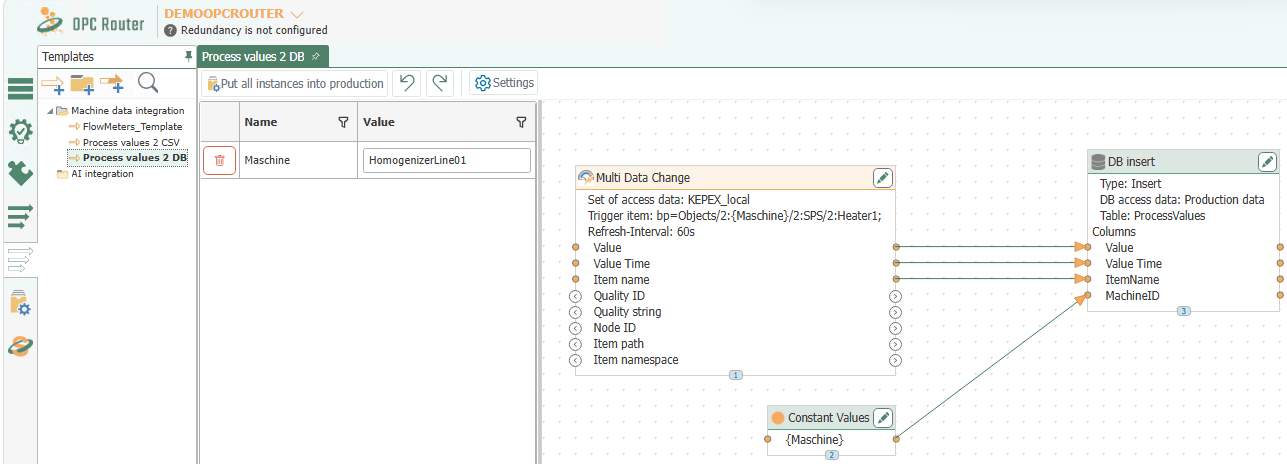
Creating a Template
- In the “Templates” snap-in, select the “New Template” button (
 ).
Alternatively, right-click an existing entry and select “New Template.”
).
Alternatively, right-click an existing entry and select “New Template.” - Enter a name for the template.
- Define the connection properties. These settings will later be applied to all instances created from this template.
- Configure the connection within the template.
In this example, the OPC server is configured so that the data points have identical names and differ only in their access path. This variable part is therefore created as a template variable.
Creating a Template Variable
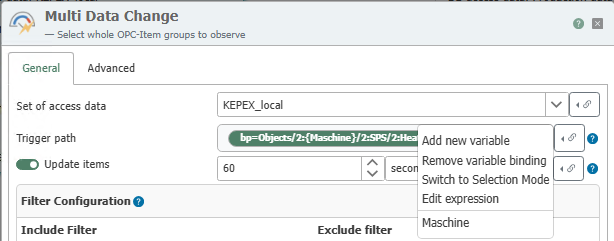
- Place a Multi Data Change Trigger object in the template and double-click it to open it.
- Open the context menu in the “OPC Data Points” field. There, you can create a new template variable, insert an existing template variable, and edit the field value using the Expression Editor if necessary.
- Select “Create Template Variable” and assign the name
Machine.
The template variable is then used directly for the variable part of the path.
Using a Template Variable in the Trigger Object
Enter the properties. Insert the template variable into the field via the context menu. Then complete the rest of the path, using the Expression Editor if necessary.
In the example shown, this creates a Kepware browse path in which the machine name is inserted via the template variable Machine.
| Name | Value |
|---|---|
| OPC Connection | <name der="" anbindung="" aus="" plug-in-konfiguration=""> |
| OPC Data Points | bp=Objects/2:{Machine}/2:SPS/2:Heater1; |
Then close the Multi Data Change trigger object.
Add a Database Object
Now configure a DB Insert transfer object for logging. In this example, the ProcessValues table is used. The measurement series is defined by the MachineID and ItemName fields. With the exception of the machine ID, the data is provided by the OPC server via the Multi Data Change Trigger.
| Name | Configuration |
|---|---|
| Data Source | <name der="" anbindung="" aus="" plug-in-konfiguration=""> |
| Table | ProcessValues |
| Columns -> Used | ItemName (String), Value (Single), Value Time (DateTime), MachineID (Int32) |
Complete the Connection
- Define a constant using the template variable “Machine.”
- Connect the constant to
MachineID. - Also connect
Value,Value Time, andItem Namefrom the Multi Data Change trigger object to the DB Insert transfer object.
The template is now complete. You can organize templates into groups just like regular connections.
Using Template Variables in Objects
You can add template variables in two ways:
- Using the “Add” button in the trigger and transfer object dialogs.
- Using the buttons with the blue plus sign next to the individual fields. This creates and populates a new variable of the correct type.
Use the button with the red minus sign to remove template variables from the fields.
You can drag and drop existing template variables into the corresponding field.
Template Variables with OPC UA
Please note the following special considerations for configuration:
- If the OPC connection itself is a template variable, the OPC Router cannot recognize the specification, and you will no longer be able to browse the trigger path. This also applies to OPC triggers (Bit, Datachange, Message, Threshold).
Creating Templates from Connections
You can also generate a template from an existing connection:
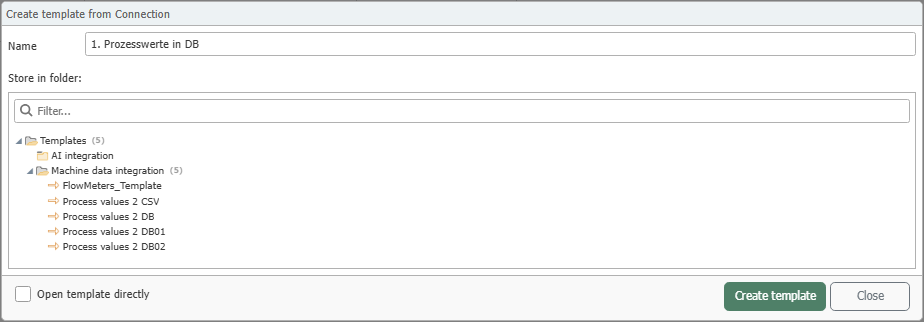
- Go to the “Connections” snap-in.
- Right-click the existing connection and select “Create Template from Connection.”
- In the dialog, enter a unique name for the new template.
- Select a destination folder if needed.
- Check the “Open template directly” box if needed.
- Click “OK” to confirm.