Providing Simulated Production Data via REST Triggers
This example shows how even a small RESTful web service with Bearer token authentication can be provided within the OPC Router itself. The web service provides simulated production data from a machine. The values are generated within the connection using formula and calculator transfer objects.
Target Configuration
The example consists of two separate connections within the same REST Server plug-in. These two workflows are created one after the other and then put into production:
- A connection with a REST trigger using the
POSTmethod provides a token endpoint. - A second connection with a REST trigger using the
GETmethod delivers the actual production data.
The typical process is as follows:
- A client calls the endpoint for the token request using
POST. - The OPC Router verifies
client_idandclient_secret. - The OPC Router returns a bearer token as a JSON response.
- The client then calls the data endpoint via
GETand passes the bearer token in theAuthorizationheader. - The OPC Router checks the header and returns the simulated production data.
Initial Situation
For this example, we assume a single machine, PRESS-01. The data endpoint is intended to provide the following values, for example:
- Current count
- Scrap quantity
- OEE value
- Machine status
- Timestamp of the last update
In this example, the values do not come from a third-party system but are generated in the OPC Router using formula and calculator transfer objects. This keeps the example self-contained and allows it to be understood without an additional data source.
Example Calls
Token Query
POST http://localhost:50117/api/auth/token
Content-Type: application/json

{
  "client_id": "demo-client",
  "client_secret": "demo-secret"
}
A possible response looks like this:
{
  "access_token": "opcrouter-demo-token",
  "token_type": "Bearer",
  "expires_in": 3600
}
Value Query
GET http://localhost:50117/api/production-data
Authorization: Bearer opcrouter-demo-token
Accept: application/json
A possible response looks like this:
{
  "machine_id": "PRESS-01",
  "quantity": 524,
  "scrap": 11,
  "oee": 0.82,
  "state": "Production",
  "timestamp": "2026-05-11T14:30:00Z"
}
Setup in the OPC Router
REST Server Plug-in
First, create a REST server plug-in that provides both endpoints. For example, use the route prefix api.
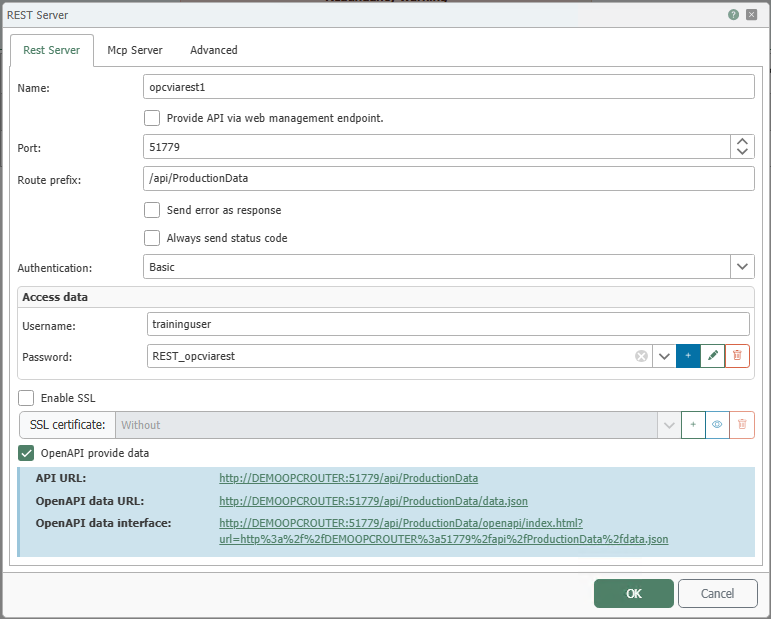
The basic functionality of the REST server and the REST trigger is described in the respective reference pages.
REST Trigger for the Token Query
Set up your first standalone connection using a REST trigger for the token query.
- Use
auth/token, for example, as the endpoint. - Select
POSTas the HTTP method. - Select
application/jsonas the response format. - Create a request parameter for the request body.
- Create a response parameter for the response body.
Then read the request body using a JSON-read transfer object and extract at least the client_id and client_secret fields.
Then, use a formula and calculator transfer object to verify that the two values match the expected demo credentials, such as demo-client and demo-secret.
If the values are valid, use a JSON write transfer object to generate the token response. For a self-contained example, a fixed token value such as opcrouter-demo-token is sufficient.
A possible JSON structure for the response is:
{
  "access_token": "opcrouter-demo-token",
  "token_type": "Bearer",
  "expires_in": 3600
}
Link the generated JSON content to the response body of the REST trigger.
Then put this connection into production before testing or putting the second connection into production.
REST Trigger for the Value Query
Next, configure a second, standalone connection with a REST trigger for the actual data query.
- Use
production-dataas the endpoint, for example. - Select
GETas the HTTP method. - Select
application/jsonas the response format. - Create a request parameter of type
HTTP Header. - Use
Authorizationas the header name. - Create a response parameter for the response body.
Then verify that the header content matches the expected value Bearer opcrouter-demo-token.
Next, generate the production data using formula and calculator transfer objects. For a simple demo scenario, you can use constant or slightly varied values, for example:
quantity = 524scrap = 11oee = 0.82state = Production
Then, use a JSON Write transfer object to combine these values into a JSON response and connect the result to the response body of the REST trigger.
One possible JSON structure is:
{
  "machine_id": "PRESS-01",
  "quantity": 524,
  "scrap": 11,
  "oee": 0.82,
  "state": "Production",
  "timestamp": "2026-05-11T14:30:00Z"
}
Next, put this second connection into production as well.
Recommended Project Structure
For a well-organized demo project, the following structure is recommended:
- Connection
Token Querywith a REST trigger, JSON read, formula and calculator transfer objects, and a JSON write transfer object. Production Dataconnection with a REST trigger, formula and calculator transfer objects for value generation, and a JSON write transfer object.- Optionally, one or more variables if intermediate results need to be stored separately or reused.
Switch to Production
Since this example consists of two separate connections, both connections must be explicitly switched to production after configuration. A general description of this process can be found on the [Create Connection] page (../../../../faq/connection_projecting/connection_projecting_create_connection.md). The section on the pop-up menu there also describes the Activate Connection button.
For this example, the following sequence is recommended:
- Create the
Token Queryconnection and put it into production. - Test the token endpoint using
POST. - Create the
Production Dataconnection and put it into production. - Test the data endpoint using
GETwith the bearer token.
Sample Project for Import
The complete sample project is available as rest_bearer_token_and_production_data_example.rpe.
The project file contains the two REST trigger connections described here, as well as the two connections from the Connection with Bearer Token example.
Import this project file into the OPC Router to fully understand the example and test it right away.