Create Templates
The following example assumes that OPC Server and data base are correctly connected. In this example the tags within the OPC Server are projected custom-fit, so that only one template variable is necessary, to collect the data.

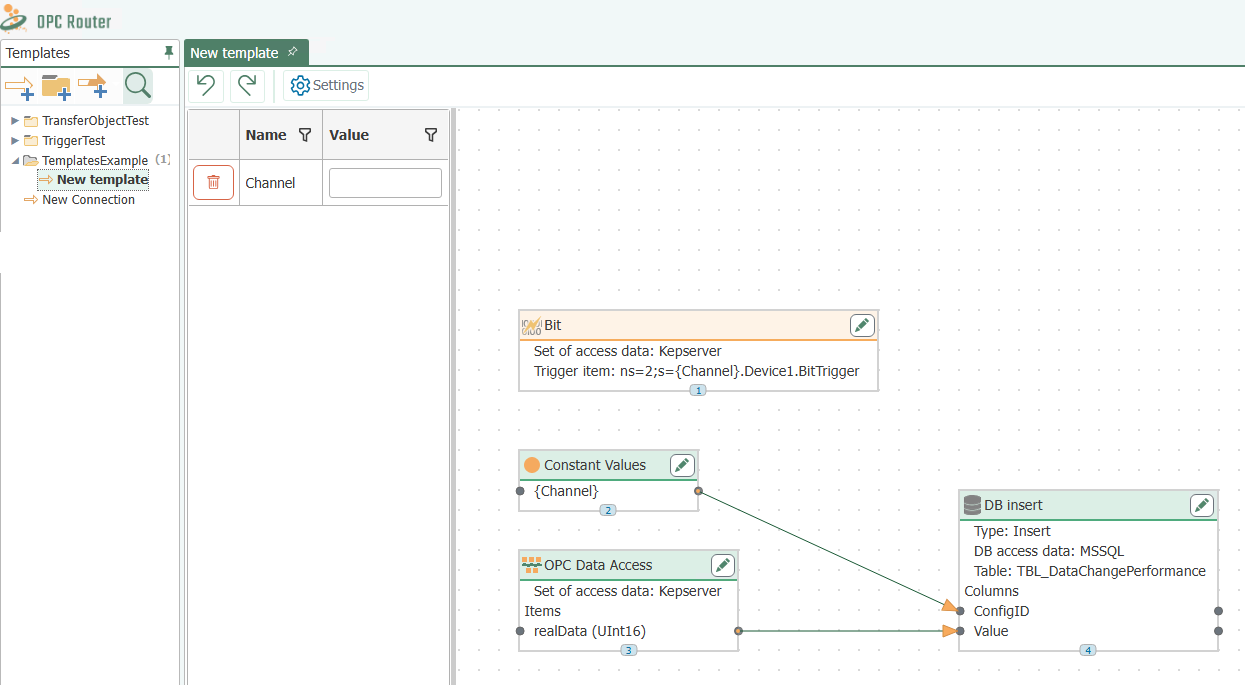
Example of a template
- In the snap-in “Templates”, select the “New template” button or right-click on an existing entry and select there “New template”.
- Name it, e. g. like here “Wago Channel”.
- Define the connection properties for the template. The Properties will be applied for all instances.
- Project the connection. In this example we want to collect data from a Wago controller The OPC Server is projected to name the items (tags) identically and to put them into different access paths. This path is to be created as template variable. So you have to place an OPC transfer object in the template and open it via double click. It opens a window for editing template variables at the same time.
- Create a template variable Channel. To do that, click “Add” in the template variable dialouge and state Name (“Channel”) and Type (“Integer”).
- Fill in the properties. First insert the template variable via drag & drop. It is integrated into the transfer object with the correct syntax. Then add the static string.
| OPC Access Data | <Name of the Access Data from the Plug-In Configuration> |
| OPC-Items | g\_atDBDataBlock\*\*\[**{Channel}**]\*\*.rRealData |
- Close the OPC transfer object.
- Project a data base transfer object for recording. At this point a table TBL_Values is to be used for collecting. The test series is defined by the field ConfigID, the time stamp is given from the data base.
| DB-Access Data | <Name Of the Access Data From the Plug-In Configuration> |
| Type | Insert |
| Table | TBL_DataChangePerformance |
| Used Columns | ConfigID, Value |
- Project a constant value with the value Channel. The constant must be of type Auto, so that at runtime the string can be converted to an integer (the ConfigID column is expected to do so).
- Connect the constant value to the ConfigID and the item with the value.
- Project a Bit Trigger, to start the transfer. Activate either reset bit or insert a response bit, depending on the PLC program.
| OPC-Item | g\_atDBDataBlock\*\*\[**{Channel}**]\*\*.tHandshakeBits.xTrigger |
With this the template is ready. You can sort templates to groups just like normal connections.
Handling template variables in objects
Template variables can be added
- via the “Add” button in the object dialogs.
- via the buttons with the blue plus sign next to the individual fields. This creates and enters a new variable of the correct type.
The button with the red minus sign removes the template variables from the fields.
Existing template variables are drag & drop into the corresponding field.
Template variables with OPC-UA
Please note for the projection:
- If the OPC data access is a template variable itself, the router can´t recognize the specification. It only states the property Item. If you create a connection from the template and the OPC data access is a OPC-UA data access, the Node ID must be stated under Item.
- Are the data accesses from OPC-Triggers (Bit, Datachange, Message, Grenzwert) template variables, the Node ID has to be stated as well, while creating a connection from the template.
Create templates from connections
You can generate a template from a connection:
- In the snap-in pane, select a connection.
- Right-click to select “Create template from connection”.
- Give the new template a unique name and confirm with “OK”.
- If you activate the “Open template directly” checkbox at the bottom of the window, the template will be opened after it has been created.