MQTT Cloud Profile: Azure IoT Hub
This chapter describes the additional "Azure" tab in the MQTT plug-in. All general MQTT settings (default profile) can be found at MQTT Plug-in Configuration.
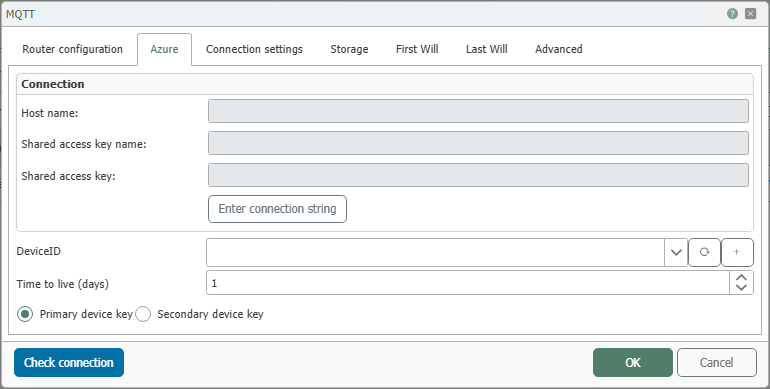
Principle: The Azure tab supplements the standard configuration with fields for authentication via Shared Access Keys (SAS tokens) and device IDs for secure access to the Azure IoT Hub.
Azure
Recommended first steps according to the step-by-step guide: Enter connection string, Select or create device, Test connection. For details, see Knowledge Base article.
| Field | Description |
|---|---|
| Hostname | Hostname of the Azure IoT Hub. Displayed in Azure under IoT Hub → Overview → Hostname (e.g., myhub.azure-devices.net). |
| Shared access key name | Name of an IoT Hub policy from Shared access policies. For the workflow shown in the screenshot, the policy should have at least device management access. |
| Shared access key | The key of the selected IoT Hub policy from Shared access policies. It is used to access device identities in the IoT Hub. |
| Enter connection string | Opens a pop-up for directly entering an IoT Hub connection string in the format HostName=...;SharedAccessKeyName=...;SharedAccessKey=.... This is the connection string for a hub policy, not the device-specific connection string. |
| DeviceID | Unique device ID in the IoT Hub. The device must exist in the IoT Hub’s Identity Registry; it can be created from within the interface using +. |
| Time to live (days) | Lifetime of the generated token in days. Upon expiration, a new token is automatically generated from the access key. |
| Primary Device Key | Uses the primary symmetric key of the selected device identity for authentication. |
| Secondary Device Key | Uses the secondary symmetric key of the selected device identity for authentication. |
| Test Connection | Tests the connection to the specified IoT Hub and token. |
Prerequisites in Azure IoT Hub
-
Create an IoT Hub: Via Azure Portal → Create a resource → Internet of Things → IoT Hub.
-
Create a device identity: IoT Hub → Device management → Devices → Add Device and create a DeviceID. For this workflow, symmetric key authentication is typically used to ensure that primary and secondary device keys are available.
-
Check IoT Hub policy: Under Shared access policies, ensure that a hub policy with sufficient permissions for device management is in place. To read and create device identities, you need at least permissions for the Identity Registry, for example via
registryReadWriteor a custom policy configured accordingly. -
Copy access credentials:
- Hostname (e.g.,
example.azure-devices.net) - Shared access key name (Hub policy)
- Shared access key (key of the hub policy)
- Hostname (e.g.,
Certificates / Security
- By default, Azure IoT uses TLS for all MQTT connections (port 8883).
- Therefore, TLS/SSL must be enabled in the Connection settings.
- Manual certificate selection is generally not required, as Azure secures the connection using public root certificates.
Configuration in the MQTT Plug-in (Azure tab)
-
Open Plug-ins → MQTT and create/edit a connection.
-
Router settings: Select the Azure IoT cloud profile.
-
Azure tab (recommended according to the tutorial):
- Click Enter connection string and enter the Primary connection string of the desired policy (e.g.,
iothubowner). - Select DeviceID or create a new one using +.
- Run Test connection.
- Click Enter connection string and enter the Primary connection string of the desired policy (e.g.,
-
Alternative: Manually enter the Hostname, Shared access key name, and Shared access key of the IoT Hub policy, then select the desired DeviceID.
-
Check Connection settings / First Will / Last Will / Advanced if necessary; then save with OK.
Typical Settings / Notes
- QoS: See MQTT Performance for details on latency and throughput.
- Storage: To retrieve the last saved value persistently, enable MQTT Data Storage (see MQTT Storage Read Transfer Object).
- Client ID: Should match the device ID if multiple devices are connected to the same IoT Hub simultaneously.
- TLS Port: Default is 8883; alternatively, WebSocket over port 443 (not recommended for OPC Router).
Troubleshooting
| Symptom | Cause / Solution |
|---|---|
| 401 Unauthorized | Incorrect or expired SAS token, or unsuitable device key. Check Time to live (days) and ensure that the correct primary or secondary device key is used for the selected DeviceID. |
| Device not found | DeviceID does not match the Azure IoT Hub Identity Registry. Check in Device management → Devices. |
| Connection refused (Port 8883) | TLS disabled or port blocked. Check firewall and TLS settings. |
| Access denied (Policy) | The IoT Hub policy used does not have the required permissions, or local shared access policies are disabled in the IoT Hub. Check shared access policies and the policy permissions. |
See also
- Main configuration: MQTT Plug-in Configuration
- Performance / QoS / RTT: MQTT Performance
- Reading from storage: MQTT Storage Read Transfer Object