Activate license in OPC Router
In demo mode, you can extensively test all standard modules. After licensing, the licensed modules are productive, while the others remain in demo mode.
If you need a demo license that is valid for a longer period, our sales department can issue one for you. For example, for a 30-day demo license. Please contact our sales department for more information.
Licensing is done via the OPC Router license portal. Licenses can be imported online or offline.
Licensing can also be configured using environment variables. For more information, see the page “Licensing via Environment Variables.”
The License Page
Navigate to the menu by clicking  , and select the menu item “License”.” On the page “License overview”, the two activation methods are displayed as two tiles side by side, each with a second button below it.
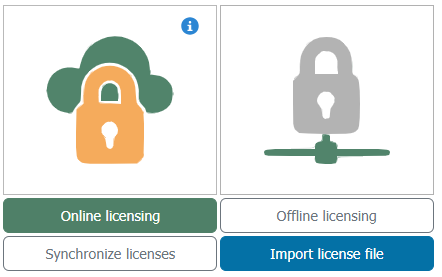
| Button | Purpose |
|---|---|
| “Online licensing” | Starts the activation process via the license portal. The system requires an Internet connection for this. |
| “Synchronize licenses” | Manually initiates the synchronization with the license portal. |
| “Offline licensing” | Starts activation via a request and activation file—for systems without their own Internet connection. |
| “Import license file” | Imports an activation file that you previously generated in the license portal. |
To the left of this are two settings: “Auto sync license” automatically synchronizes licenses with the portal, and “Send telemetry data” controls the transmission of telemetry data. Below that, the table lists the license overview.
For online licensing, the following domains must be accessible:
https://opcrouter.eu.auth0.com\ https://login.opc-router.cloud\ https://license.opc-router.com\ https://crl.inray.cloud\ http://inray.de\ https://inray.de
In addition, the certificates of the involved destinations are verified via *.pki.goog and *.lencr.org on Port 80. The complete list of ports, purposes, and requirements for the proxy and TLS inspection can be found under Network Requirements for Firewall and Proxy.
Online Licensing
The online process uses a device code: The OPC Router displays a code that you confirm in the licensing portal. Afterward, select the license in the portal that is to run on this system.
-
Click on “Online licensing”.
-
The window
Loginopens. It displays a security code in the formatXXXX-XXXXand, below it, a link that already contains the code and leads to the license portal.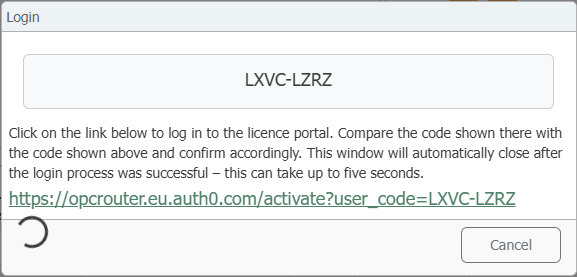
-
Open the link—preferably in a second browser tab so that the window in OPC Router remains open. The portal displays the “Device Activation” page with the code already entered, followed by the “Confirm Your Device” page with the “Secure Code” field. If the code matches the one in OPC Router, confirm it; if it does not match, cancel the process in the portal and start over.
-
The portal will then take you to the login page with the “Continue to License Portal” button. From there, log in to the license portal—using your username and password or an existing Microsoft or LinkedIn account. If you do not yet have a user account, you can create one. After successfully logging in, the portal will indicate that the device has a connection.
-
The “
Login” window in OPC Router closes automatically once the login process is complete; this may take a few seconds. -
In the “Enter system data” window, enter the system’s details: Licensee and System—the “System” field is pre-filled with the computer’s hostname—as well as the optional Location and Description. Confirm by clicking “Next”.”
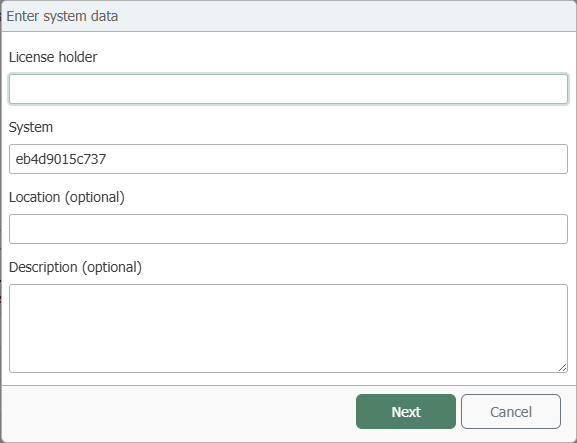 , and Description
This window appears for both activation methods as long as the system is being licensed for the first time. It does not appear for a system that has already been licensed.
-
The OPC Router then prompts you to synchronize the license information with the license portal to ensure the license is assigned to the system. Confirm the prompt by clicking “OK”.”
-
In the “License Selection” window, a table lists the available licenses with the columns “OPC Router ID,” “License Type,” “Starting Version,” “Available Activations,” and “Maintenance/Subscription End Date.” Select the row for the license you want to run on this system and confirm by clicking “Next”.” If you have a license key on hand, first add another license by clicking “Add license key”.”
-
In the “Complete Licensing” window, select one of the two options—“Automatic Synchronization” or “Cloud Status and Telemetry”—and complete the process by clicking “Done.”
-
The OPC Router displays the message “Synchronization complete—The license has been synchronized.” The license overview at the bottom of the page will then list the license under the assigned system name.
If the selected license has already reached its activation limit, the OPC Router will report overprovisioning before completion. The warning specifies how many systems the license would then be active on and how many are permitted. If you proceed with licensing anyway, the OPC Router will then request a reason for the overprovisioning as free text; without this information, activation will not take place.
If you cancel the process in the “Login” window by clicking “Cancel” or decline to confirm in the portal, the OPC Router will report an authentication error. In this case, nothing will be activated; the process will start over with a new code. The same applies if too much time elapses: The device code expires after a few minutes; the portal then rejects it as an invalid or expired user code, and you must restart the process in the OPC Router.
Offline Licensing
- Click on “Offline licensing”.
- In the “Enter system data” window, enter the licensee, system, and optionally the location and description, then confirm by clicking “Next”—this is the same window as in Step 6 of the online procedure. If the system has already been licensed, it will not appear.
- The OPC Router generates a request file and downloads it. You’ll need this file on a device with Internet access—for example, save it to an internal network drive or a USB flash drive.
- On a device with internet access, go to the OPC Router license portal and log in. If you don’t have a user account yet, you can create one or sign in with an existing Microsoft or LinkedIn account.
- After logging in, you will see an overview of your licenses. If the desired license is not listed, add it via “Add license key”.
- From the overview, start the activation process for the desired license and upload the request file. If overprovisioning occurs, a reason must be provided.
- The portal generates an activation file and downloads it. Copy this file to the server on which the OPC Router is installed.
- In the “License” menu, click “Import license file” and select the activation file.
The licenses are applied immediately and do not require a restart of the OPC Router service. In addition, the term for each licensed plug-in and add-on is displayed in the overview at the bottom of the page. Further information is available on the license overview page.
Future system enhancements will be licensed for your specific customer name and OPC Router ID. License keys will be credited to your account and do not need to be entered separately.