Create Instances from a File
If you want to create many instances from a template, you can import the values for the template variables in bulk. To do this, you can
- import a prepared Excel or CSV file
- or fill out a corresponding table directly in OPC Router
If the values follow a pattern—sequential numbers, a range of numbers, or an alternating list—have the table filled as a series instead of from a file: Create Instances as a Series .
The names of the template variables in the file and the template must match exactly. The columns in the CSV file can be separated by semicolons or commas.
Export and Reimport Values
You don't need to build the file manually: The “Create multiple instances” dialog provides it in the correct format.
- Under “Variable values from file”,” select the “Download template” button, then choose “As CSV” or “As XLSX”.” The file contains one column per template variable and all the rows already in the table—if the table is empty, only the header row.
- Enter the values into the file, one row per instance.
- Select “Import” and the completed file. The rows will appear in the table and can still be edited there.
This same method allows you to save a snapshot: You can download the contents of the table as a file at any time and import it again later.
“Download template”, “Import”, and “Create instances” always apply to all rows in the table. If not all rows fit within the dialog box, scroll through the table; the rows that are currently not visible will still be processed.
Structure of the Import File
The CSV file has the following structure:
| InstanceName | Variable1 | Variable2 | ... |
|---|---|---|---|
| Flow Name 1 | Value | Value | Value |
| Flow Name 2 | Value | Value | Value |
| <unterordner>\Flow Name 3 | Value | Value | Value |
| ... | Value | Value | Value |
Specifying a subfolder is optional. You can distribute the flows across multiple folders and subfolders in this way.
Time Values in Template Variables
The following time offsets apply to time values:
1msfor milliseconds:1sfor seconds:1mfor minutes:1hfor hours:1dfor days:1monthfor months:1yearfor years
The full spellings of the units—millisecond, second, minute, hour, and day—are also valid, such as 2hour; case is not significant. There must be no space between the number and the unit.
Create Multiple Instances from a File
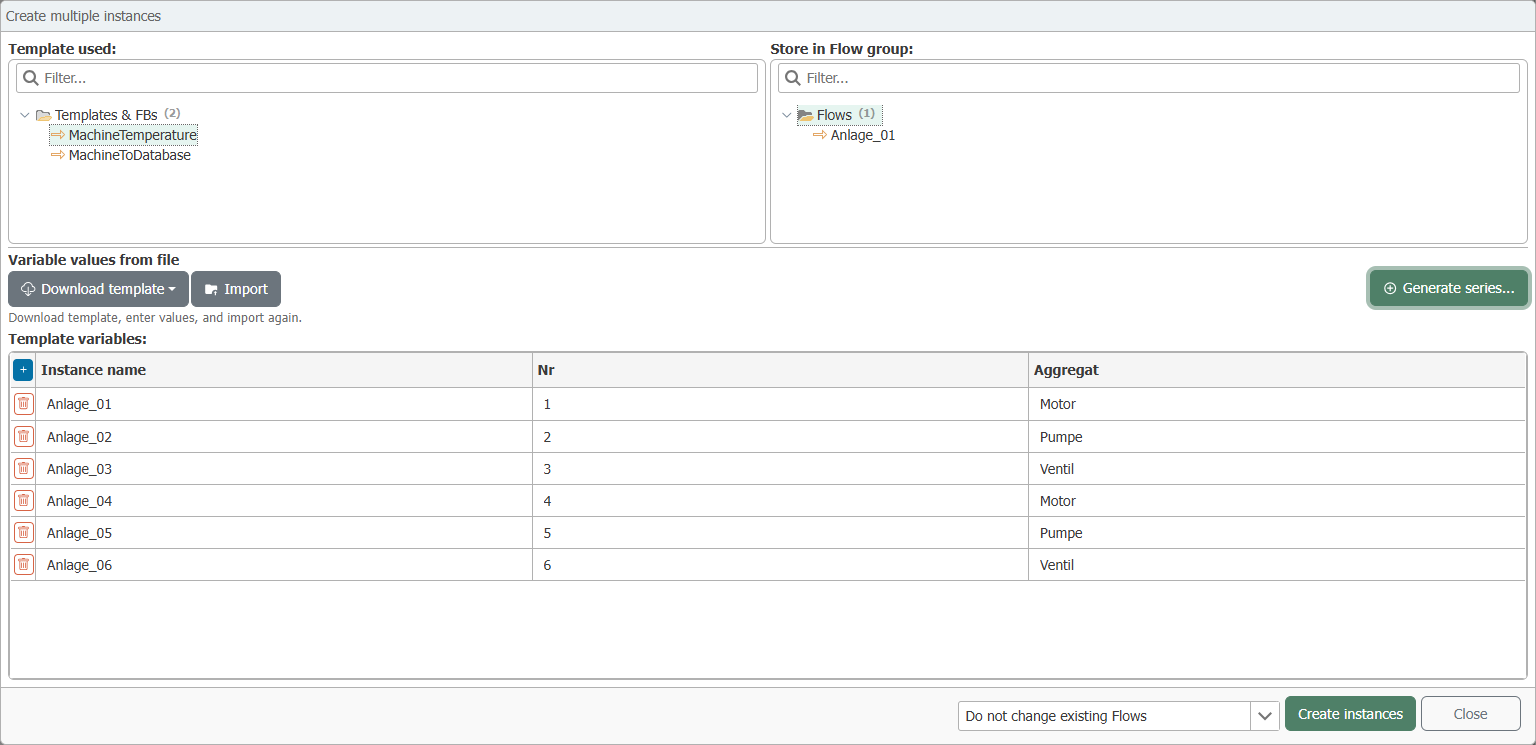
- In the “Templates” or “Flows” snap-in, select the “Create instance” drop-down button and then choose “Create multiple instances” from the list.
- Select the template under “Template used:”.” Above the tree is a filter field with the placeholder “Filter...”: As soon as you enter the first character, only the matching entries and their sub-branches remain.
- Select the destination folder at “Store in Flow group:”; there is also a filter field above this tree.
- Fill out the table at “Template variables:” (it appears as soon as a template is selected): The button with the plus sign in the header adds a blank row below, the trash can icon at the beginning of the row deletes the row after a confirmation prompt, “Import” imports a CSV or Excel file (see above for structure), and “Generate series” populates the table according to rules; see . Create instances as a series:.
- Next to the button, specify what should happen to instances with the same name: “Do not change existing Flows” leaves them as is, “Overwrite existing Flows” replaces them with the new values.
- Select “Create instances”.
- Put the new instances into production.
If you change the template later, all instances will be updated; for information on what happens to the values of their variables, see Changing the template when instances already exist .
If something doesn't work
When creating multiple instances, the OPC Router checks each row of the table individually. After the run, the “Creation completed” dialog reports how many flows were created and how many were skipped (“Flows created: … Flows skipped: …”; supplemented by “(of which … are incorrect)” for rows with errors); the progress dialog behind it shows which row was skipped and why, including the flow name and message. A row with an incorrect value is skipped, but all other instances are created regardless. An existing flow with the same name is retained, even if you selected “Overwrite existing Flows”: it is deleted and replaced only when the values in its row are error-free.
| Message | Cause | Workaround |
|---|---|---|
| “Error during instance creation: … The value … for the variable … in the flow … could not be converted. Message: …” | The value in the cell does not match the type of the template variable; for example, text in a variable of type Int32. The message also contains technical details about the error location; the part following “Message:” is relevant. | Correct the value or assign the appropriate type to the template variable. |
| “The value … is not a valid time specification.” | For a variable of the “TimeOffset” type, the unit is missing or unknown. | Enter time values as described at Time values in template variables , for example, 30s. An empty cell is allowed; in that case, the default value from the template applies. |
| “A plug-in with the name … does not exist.” | For a variable of the “Plug-in” type, there is no existing connection in the cell. | Enter the name of the connection exactly as it appears in the Plug-ins section. An empty cell is allowed; in that case, the default value from the template applies. |
| “The Flow already exists” | A flow with this name already exists, and you have selected “Do not change existing Flows”. The instance will not be created; the existing flow remains unchanged. | Rename the instance or repeat the process using “Overwrite existing Flows”. |
| “A Flow group with the same name already exists” · “The Flow name contains invalid characters.” · “The Flow name exceeds the maximum permitted length.” | The instance name from the column InstanceName cannot be used here. | Change the name in the table or in the import file. |
If the dialog displays the message “The following variables do not exist in the template: …” before the run, a column contains a name that the template does not recognize as a template variable. Adjust the column header to match the variable name—the easiest way to do this is using the file you can obtain via “Download template”.