Creating Templates
The following example assumes that the OPC server and database are correctly connected in the plug-in area. The goal is to create a template from which you can later generate multiple instances. In this example, a single template variable is sufficient to capture the data.
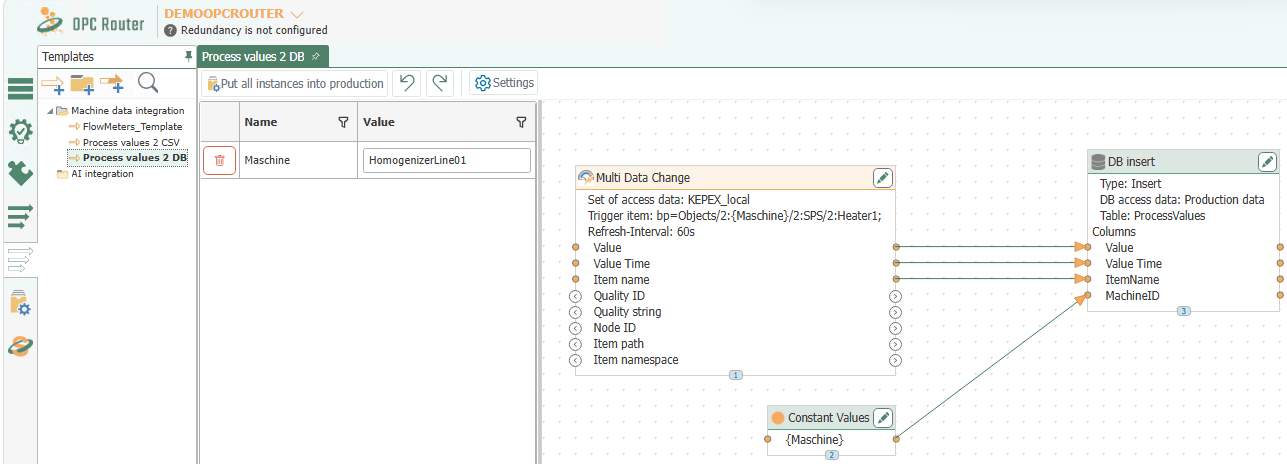
Create a Template
- In the “Templates” snap-in, select the “New template” button (
 ).
Alternatively, right-click an existing entry and select “New template”."
).
Alternatively, right-click an existing entry and select “New template”." - Enter a name for the template.
- Define the flow properties. These settings will later be applied to all instances created from this template.
- Design the flow within the template.
In this example, the OPC server is configured so that the data points have identical names and differ only in their access path. This variable part is therefore created as a template variable.
Creating a Template Variable
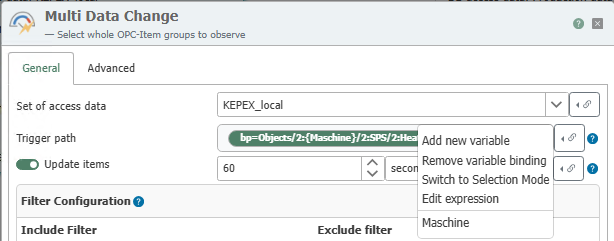
- Place a Multi Data Change Trigger object in the template and double-click it to open it.
- Open the field menu using the button to the right of the “OPC Items” field. It first lists the actions and, below them, the existing template variables; details on the individual entries can be found at The field menu in the template.
- Select “Add new variable” and assign the name "
Machine" in the dialog “Add template variable”.
The template variable is then used directly for the variable part of the path.
The field menu in the template
Within a template, every field that can hold a template variable has an additional button on the right. Clicking it opens a menu with the following entries:
| Entry | Effect |
|---|---|
| “Add new variable” | Creates a template variable of the field’s type and binds the field to it. The field then displays only the placeholder, such as {Machine}. |
| Name of an existing variable | Binds the field to this variable. Only variables whose type matches the field are offered. |
| “Remove variable binding” | Releases the connection; the field reverts to a fixed value. The variable itself remains in the template. |
| “Switch to the Expression Mode” | For text fields only: The field accepts text containing placeholders at any position—SPS.Anlage{Nr}.{Aggregat}.Temperatur. The entry is then named “Switch to Selection Mode” and returns a value. |
| “Edit expression” | In expression mode only: Opens the expression editor with the field “Expression:” and the list of available variables. |
In the expression editor, you can type a placeholder for which no variable yet exists: When you apply the changes, the OPC Router creates the variable—always of type String. A field containing a number, time interval, or boolean value does not support expression mode; it contains either a fixed value or exactly one variable of the appropriate type.
Using the Template Variable in the Trigger Object
Enter the properties. Bind the template variable to the field using the field menu. If you want fixed text to appear before or after the placeholder, select “Switch to the Expression Mode” and enter the remaining path directly into the field or via “Edit expression” in the expression editor.
In the example shown, this creates a Kepware browse path in which the machine name is inserted via the template variable Machine.
| Name | Value |
|---|---|
| OPC Connection | <name der="" anbindung="" aus="" plug-in-konfiguration=""> |
| OPC Data Points | bp=Objects/2:{Machine}/2:SPS/2:Heater1; |
Then close the Multi Data Change trigger object.
Add a Database Object
Now configure a DB Insert transfer object for logging. In this example, the ProcessValues table is used. The measurement series is defined by the MachineID and ItemName fields. With the exception of the machine ID, the data is provided by the OPC server via the Multi Data Change Trigger.
| Name | Configuration |
|---|---|
| Data Source | <name der="" anbindung="" aus="" plug-in-konfiguration=""> |
| Table | ProcessValues |
| Columns -> Used | ItemName (String), Value (Single), Value Time (DateTime), MachineID (Int32) |
Complete the Flow
- Create a constant using the template variable “Machine.”
- Connect the constant to
MachineID. - Also connect
Value,Value Time, andItem Namefrom the Multi Data Change trigger object to the DB Insert transfer object.
The template is now complete. You can organize templates into groups just like regular flows.
Using Template Variables in Objects
For information on which fields appear in the field menu and what their entries do, see . The field menu in the template ; fields containing numbers, time periods, or Boolean values only offer the options to create, bind, and unbind.
Restrictions per plug-in
A template variable can not only be placed in a single field but can also replace the connection itself (variable type “Name of a plug-in”; see the type table at Working with Templates ). In this case, when the template is configured, it is not yet clear which counterpart the flow will later communicate with—this is determined only by the instance. Validation checks and convenience features that would require knowledge of the counterpart are therefore omitted from the template; conversely, a rule is applied less strictly in one instance. Note the following for each plug-in:
- OPC: If the OPC connection itself is a template variable, the OPC Router cannot know the specification, and you can no longer browse the trigger path. This also applies to OPC triggers (Bit, Datachange, Message, Threshold). In this case, enter the addresses manually.
- OPC, Data Point Names: If the connection is a template variable, the OPC transfer object also displays the “Use display name” switch. If you leave it off, the OPC Router automatically uses the entered OPC address as the data point’s name. Turn it on if you want to assign your own names within the flow—these names will then be retained.
- REST Server: If a template variable is entered in the “Endpoint” field of a REST server trigger, the dialog no longer checks—when closing—whether the same endpoint with the same HTTP methods is already in use by another trigger. It cannot do so, because the final endpoint is only created with the value of the instance. The reverse is also true: If you later create a trigger with a fixed endpoint, the dialog will not check it against triggers whose endpoint is a template variable. Therefore, make sure yourself that each instance is assigned its own endpoint; a duplicate value will not be detected here.
- Email: Placeholder names in the email transfer object must not contain curly braces. The only exception is when the placeholder is bound to a template variable—in that case, the braces are part of the variable’s syntax.
Creating Templates from Flows
You can also generate a template from an existing flow:
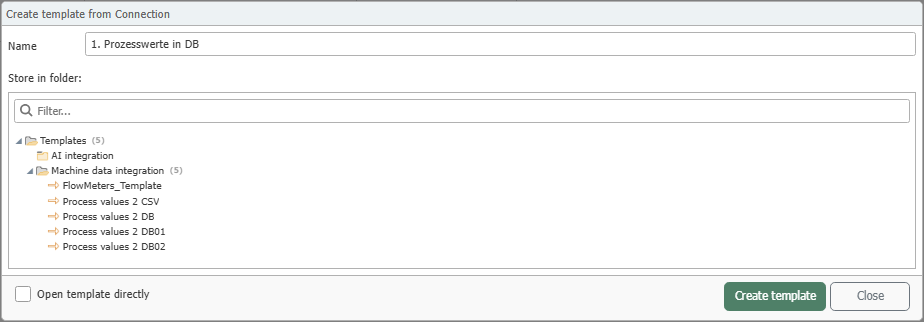
- Go to the “Flows” snap-in.
- Right-click on the existing flow and select “Create template from Flow”.”
- In the dialog, enter a unique name for the new template.
- Select a destination folder if needed.
- If necessary, check the “Open template directly” checkbox.
- Confirm by clicking “OK”.”