Make a connection to Microsoft Entra ID/Azure AD
Microsoft Entra ID, formerly Azure Active Directory, is a cloud-based service for identity and access management for applications hosted in Microsoft Azure, as well as applications running in other clouds or on-premises environments. Entra ID offers features such as single sign-on, multi-factor authentication, self-service password reset, conditional access policies, and identity protection. With Entra ID, organizations can centrally manage their users, groups, and devices and control access to their resources.
The OPC Router 5 web management interface enables user management and authentication via Entra ID through a connection with Entra ID.
For a general introduction to the underlying OAuth 2.0 concepts (Client ID, Tenant ID, Redirect URI, Scopes), see OAuth 2.0 – Basics.
This guide assumes you have an existing Microsoft Entra ID tenant.
In order for the OPC Router to use Entra ID, a new registration must be added to the application registrations in your Microsoft Entra ID tenant.
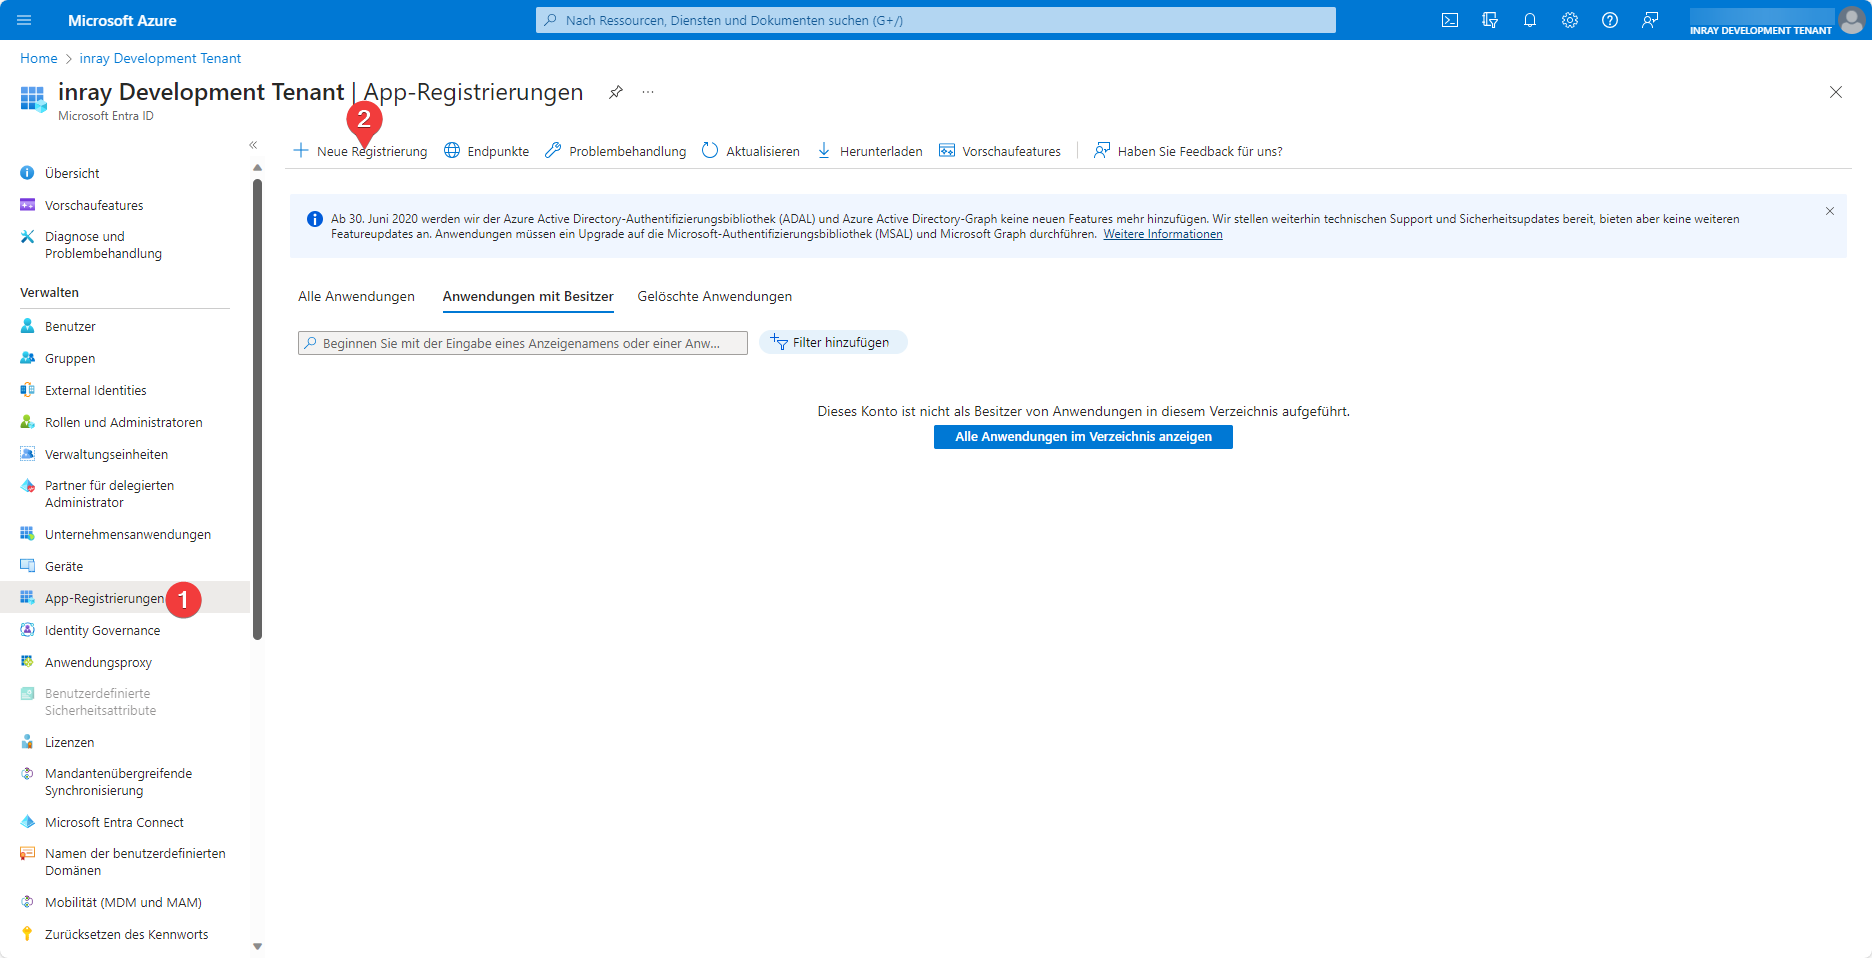
On the App Registrations (1) tab of your Microsoft Entra ID tenant, you can create a new application by clicking New Registration (2).
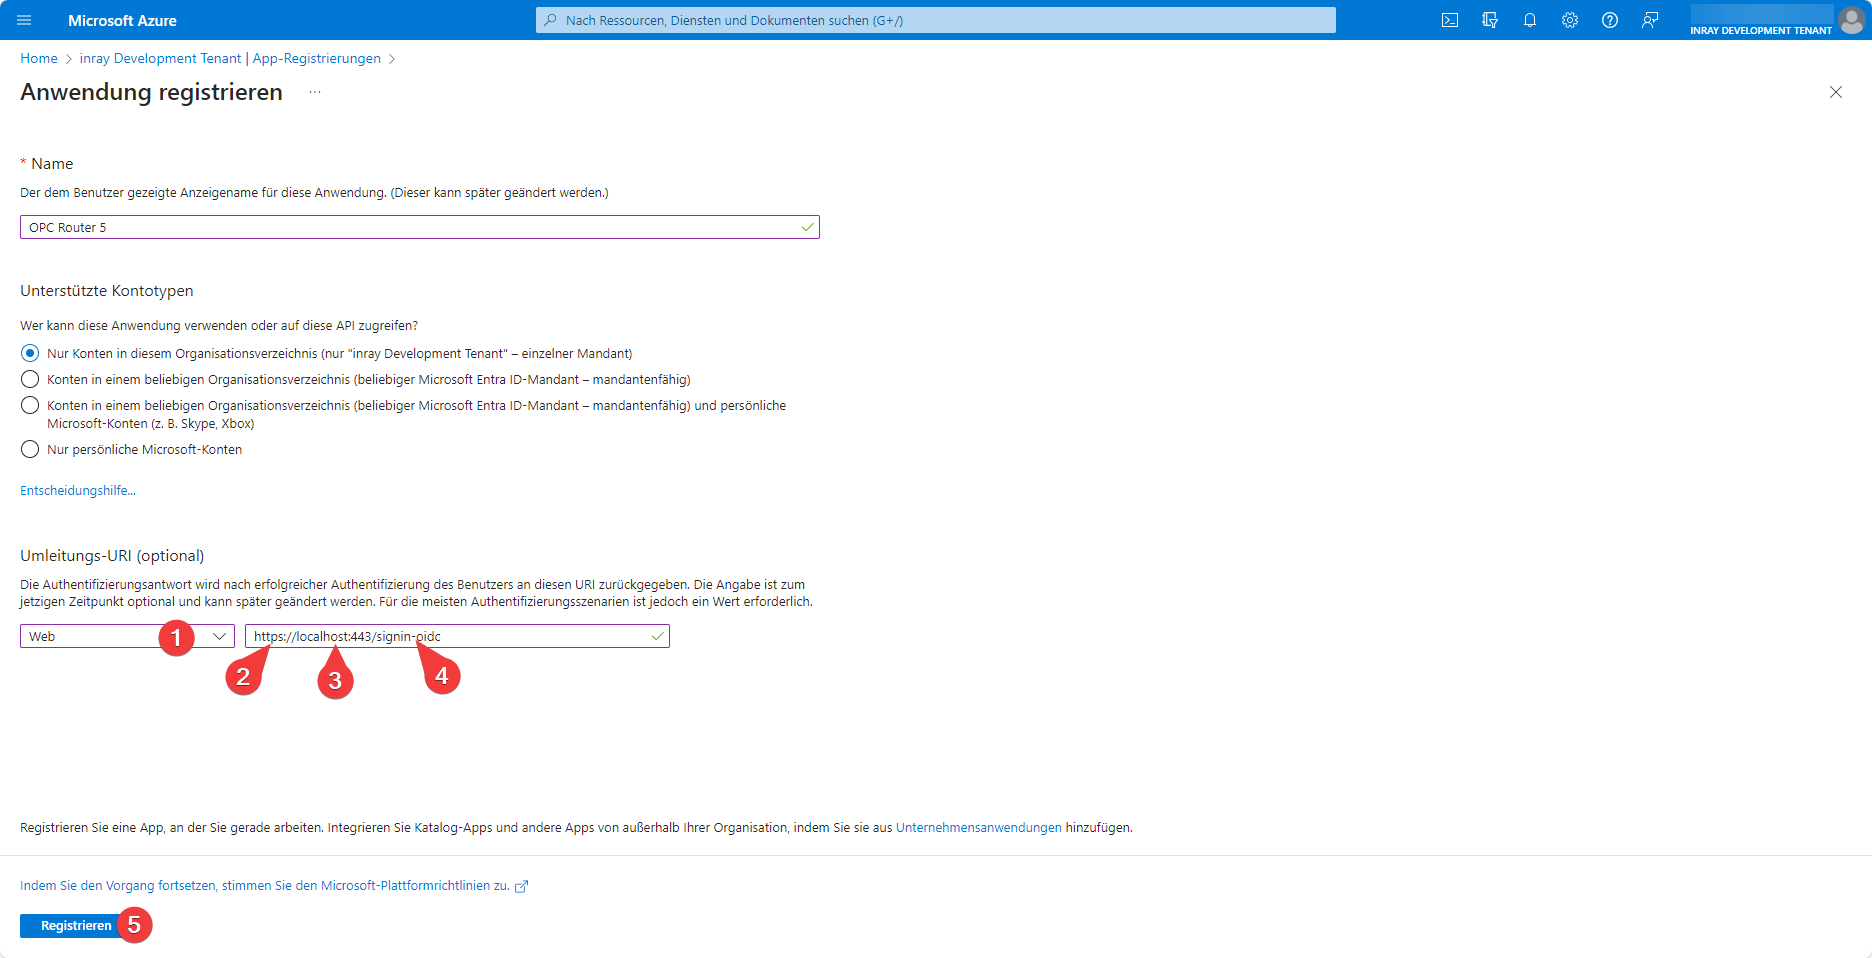
It is important to configure the application’s redirect URI. In the drop-down list (1), select Web. The Address (3) must be set to the address where Web Management is accessible. This must be the valid https (2) otherwise it is not permitted. The SSL certificate does not have to be issued by a certification authority; self-signed certificates are also permitted. To learn how to set up HTTPS for your OPC Router Web Management, see here:
The configured login request path must also be passed as the endpoint (4). By default, this is /signin-oidc, but it can also be overridden as needed using the environment variable AZURE_AD_CALLBACK_PATH.
The newly created application still needs to be configured so that authentication via Microsoft Entra ID can be performed successfully.
-25a4800c4ad605ad11671b4b985d9bda.webp)
To do this, in the App Registrations (1) tab, under the All Applications (2) group, select the application (3) you just created.
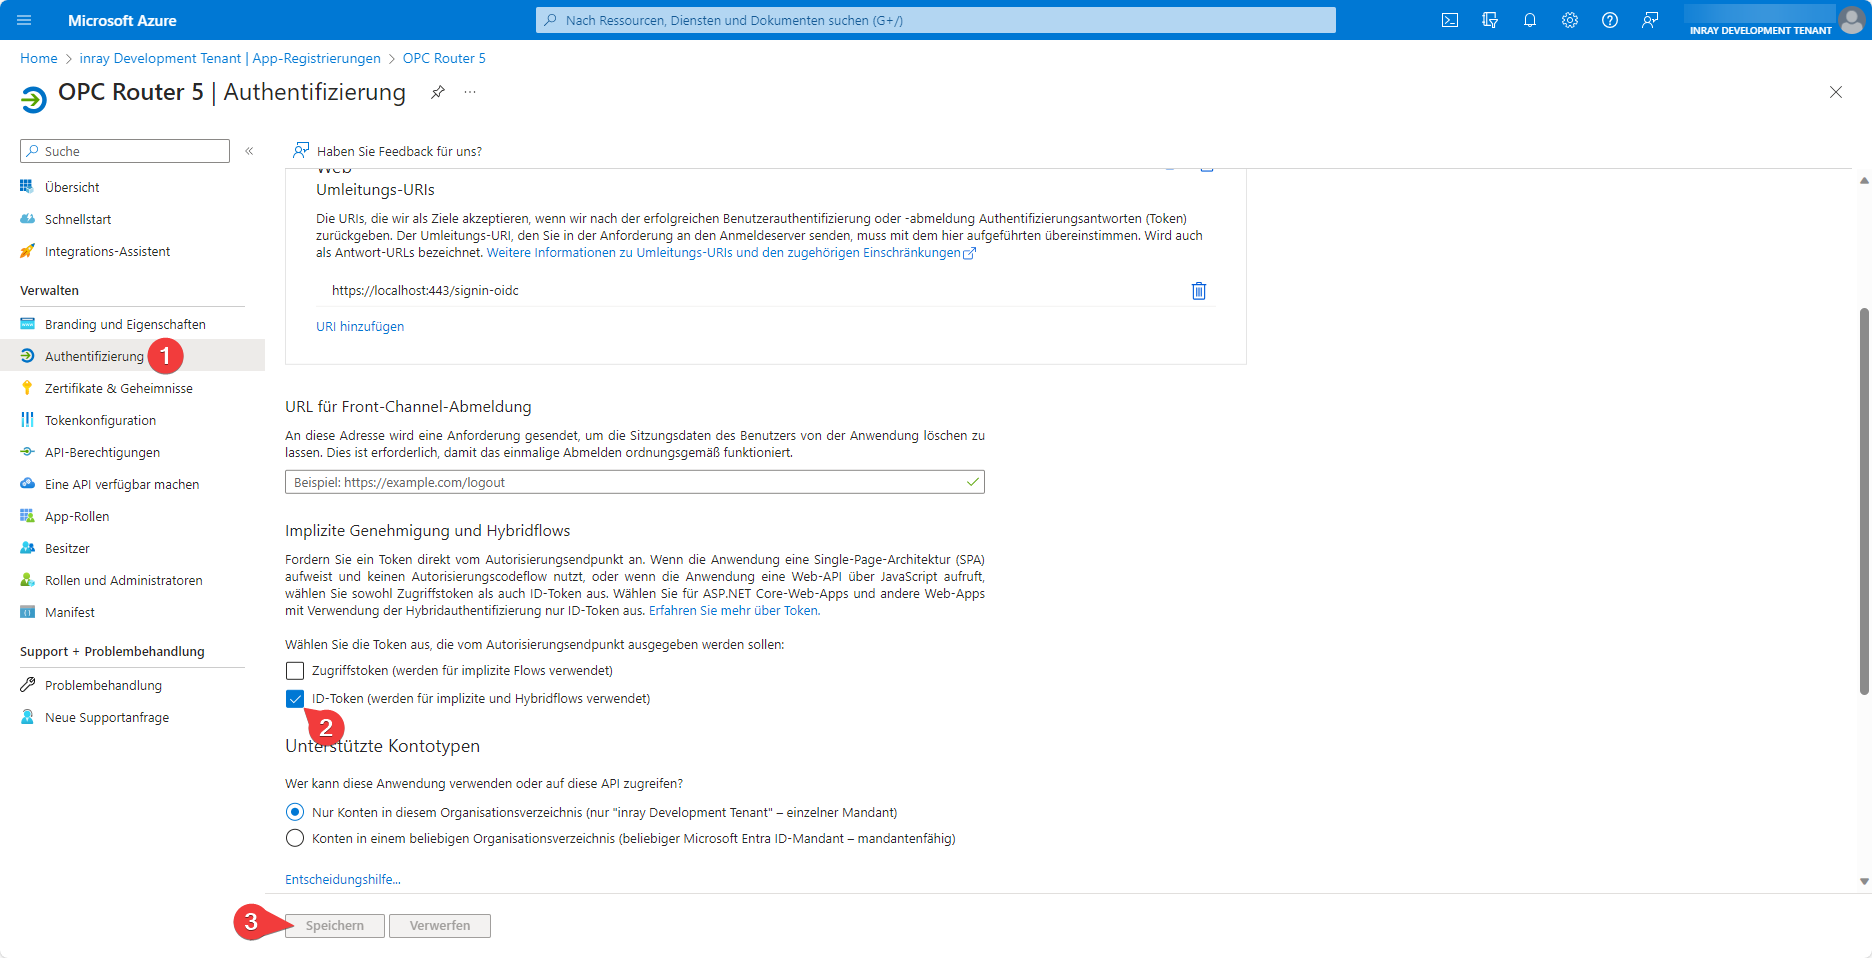
On the Authentication (1) tab, you’ll find the ID Token (2) checkbox, which must be selected for Web Management’s user administration to work with Microsoft Entra ID. Save (3) this setting change.
In your Entra ID tenant, you can now navigate to your newly configured application via the Enterprise Applications tab and use the Users and Groups tab for user management.
Create an OPC Router 5 container with a connection to Entra ID
To establish a connection between the OPC Router and Entra ID, three pieces of information from the tenant are required: the application ID, the directory ID, and a domain under which the Entra ID configuration is accessible.
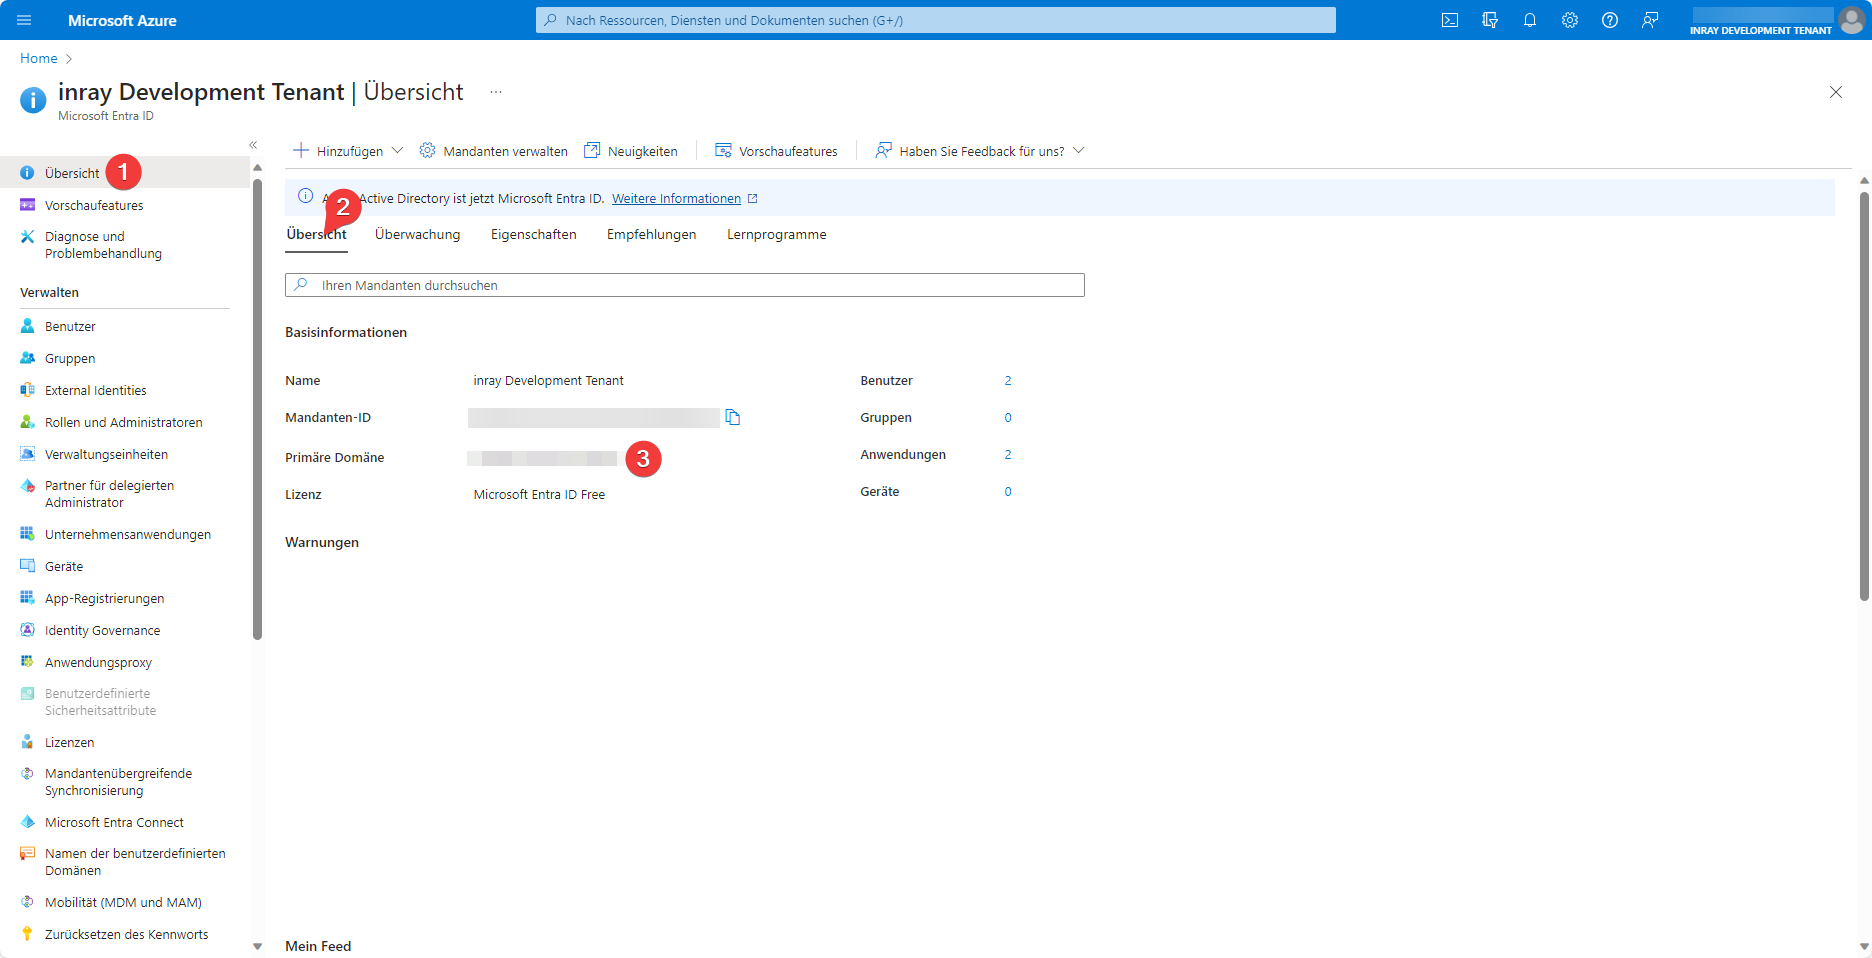
You can find the Primary Domain (3) on the Overview (1) tab under the Overview (2) section of your Entra ID tenant.
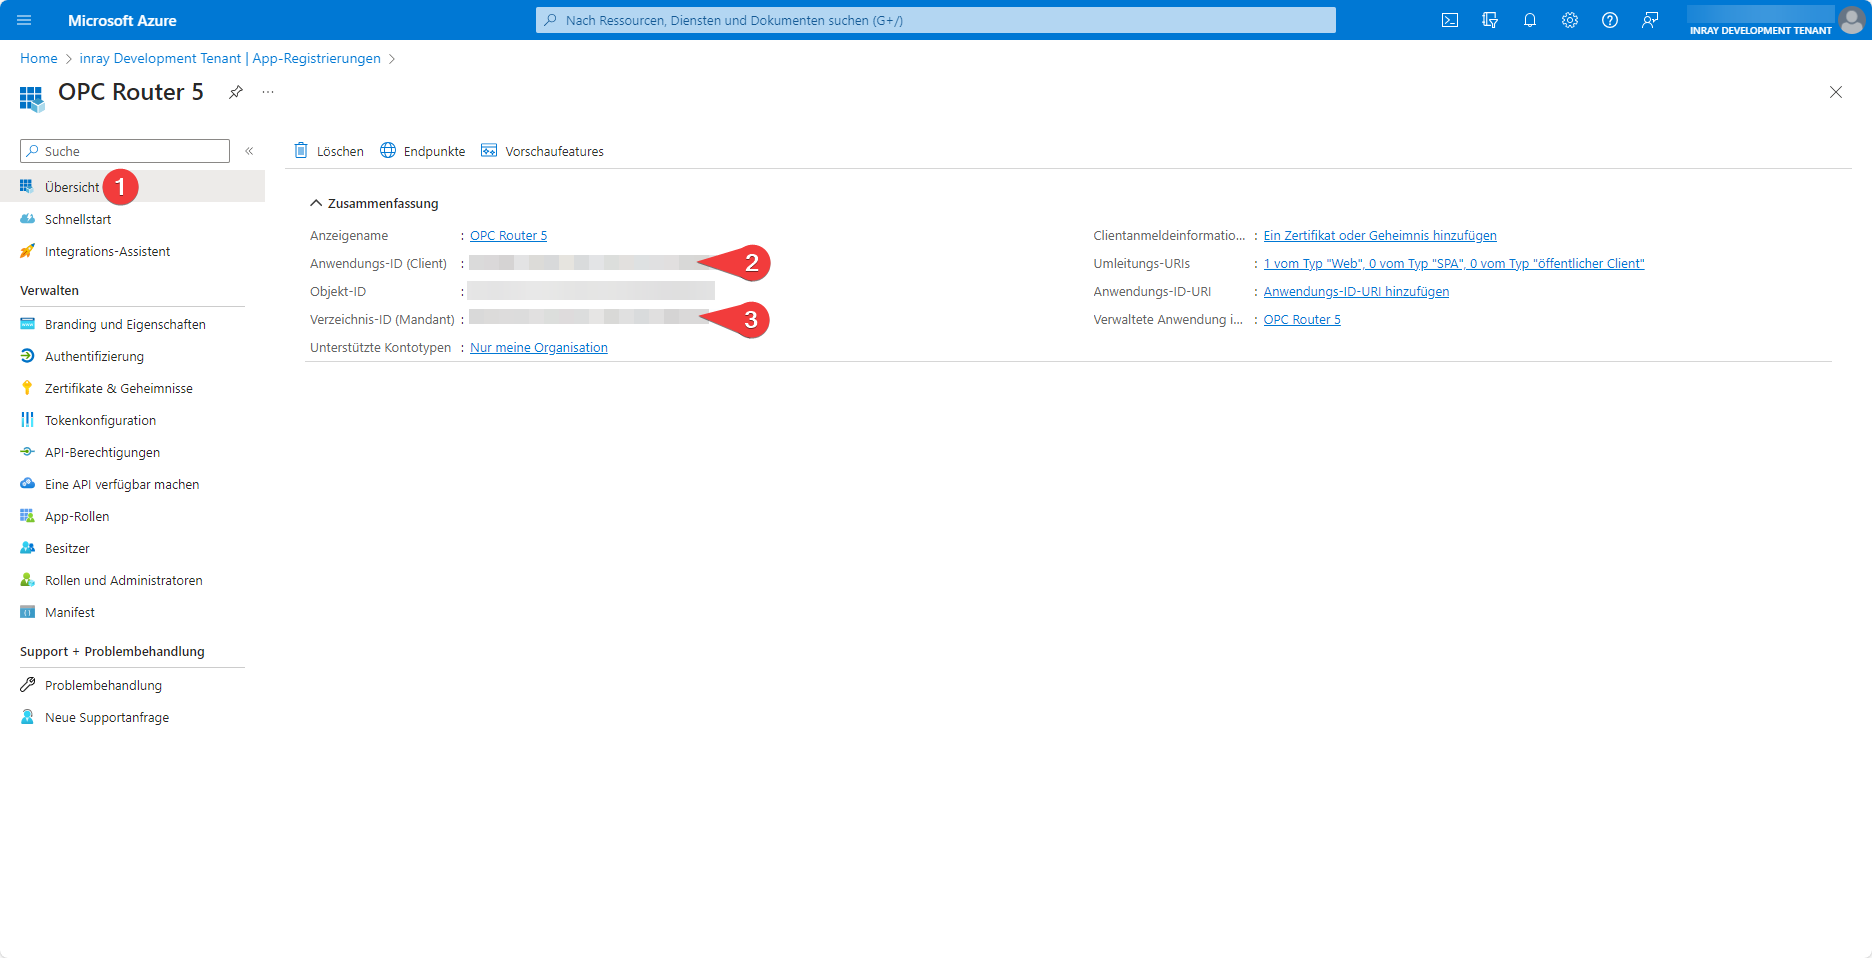
The Application ID (2) and the Directory ID (3) are displayed on the Overview (1) tab of the application registration you created.
With this information, you can now run a Docker run command that creates an OPC Router container with a connection to Entra ID:
docker run -d \
    -e OR_I_ACCEPT_EULA=true \
    -e AZURE_AD_DOMAIN=domain.onmicrosoft.com \
    -e AZURE_AD_TENANT_ID=1111111-1111-1111-1111-1111111 \
    -e AZURE_AD_CLIENT_ID=1111111-1111-1111-1111-1111111 \
    -v $PWD/https.pem:/inray/https.pem \
    -v $PWD/https.key:/inray/https.key \
    -e OR_WEB_HTTPS_CERTIFICATE_PEM_FILE=/inray/https.pem \
    -e OR_WEB_HTTPS_CERTIFICATE_KEY_PEM_FILE=/inray/https.key \
    -e OR_WEB_DISABLE_HTTPS=false \
    -p 443:8443 \
    --name opcrouterentra \
    opcrouter/runtime
By running this command and setting the environment variable OR_I_ACCEPT_EULA to true, you agree to the End User License Terms .
Enter your (primary) domain in the environment variable AZURE_AD_DOMAIN, your directory ID in the environment variable AZURE_AD_TENANT_ID, and your application ID in the environment variable AZURE_AD_CLIENT_ID.
Optionally, you can pre-provision users as external users at container startup via OR_EXTERNAL_USER_ADMIN_EMAILS, OR_EXTERNAL_USER_EDITOR_EMAILS, and OR_EXTERNAL_USER_OBSERVER_EMAILS. These users appear in user management with the "External" flag and do not require a local password.
If AZURE_AD_DISABLE_AUTO_PROVISION=true is set, only existing external users can log in. New Entra ID users will then no longer be automatically created upon their first login.
If AZURE_AD_DISABLE_AUTO_PROVISION is not set or is set to false, users will continue to be automatically created or updated during Entra ID sign-in. Roles are synchronized from the transferred role claims during each sign-in.
Without a role claim, every user who logs in becomes an administrator. If no role claims are present at login, the OPC Router currently automatically assigns the local role Admin. As long as the application registration does not assign any app roles, every user in the tenant who can log in will have full rights in the OPC Router.
Either of the following solutions can help:
- Create the app roles and assign a role to every user a role—see User Roles via Entra ID.
- Set
AZURE_AD_DISABLE_AUTO_PROVISION=true. Then only users who already exist as external users in the OPC Router can log in, and you define their roles in advance—e.g., when starting the container viaOR_EXTERNAL_USER_ADMIN_EMAILS,OR_EXTERNAL_USER_EDITOR_EMAILS, andOR_EXTERNAL_USER_OBSERVER_EMAILS.
If only Microsoft Entra ID is to be used for login, INITIAL_USERNAME and INITIAL_PASSWORD can be omitted.
For authentication via Entra ID to work, HTTPS must be set up on the container—the command includes the necessary arguments for this. It expects the certificate and key to be located at https.pem and https.key in the current directory and is intended for a Bash shell; see Using HTTPS for instructions on how to create both. Also, replace “domain,” “directory ID,” and “application ID” with your own values.
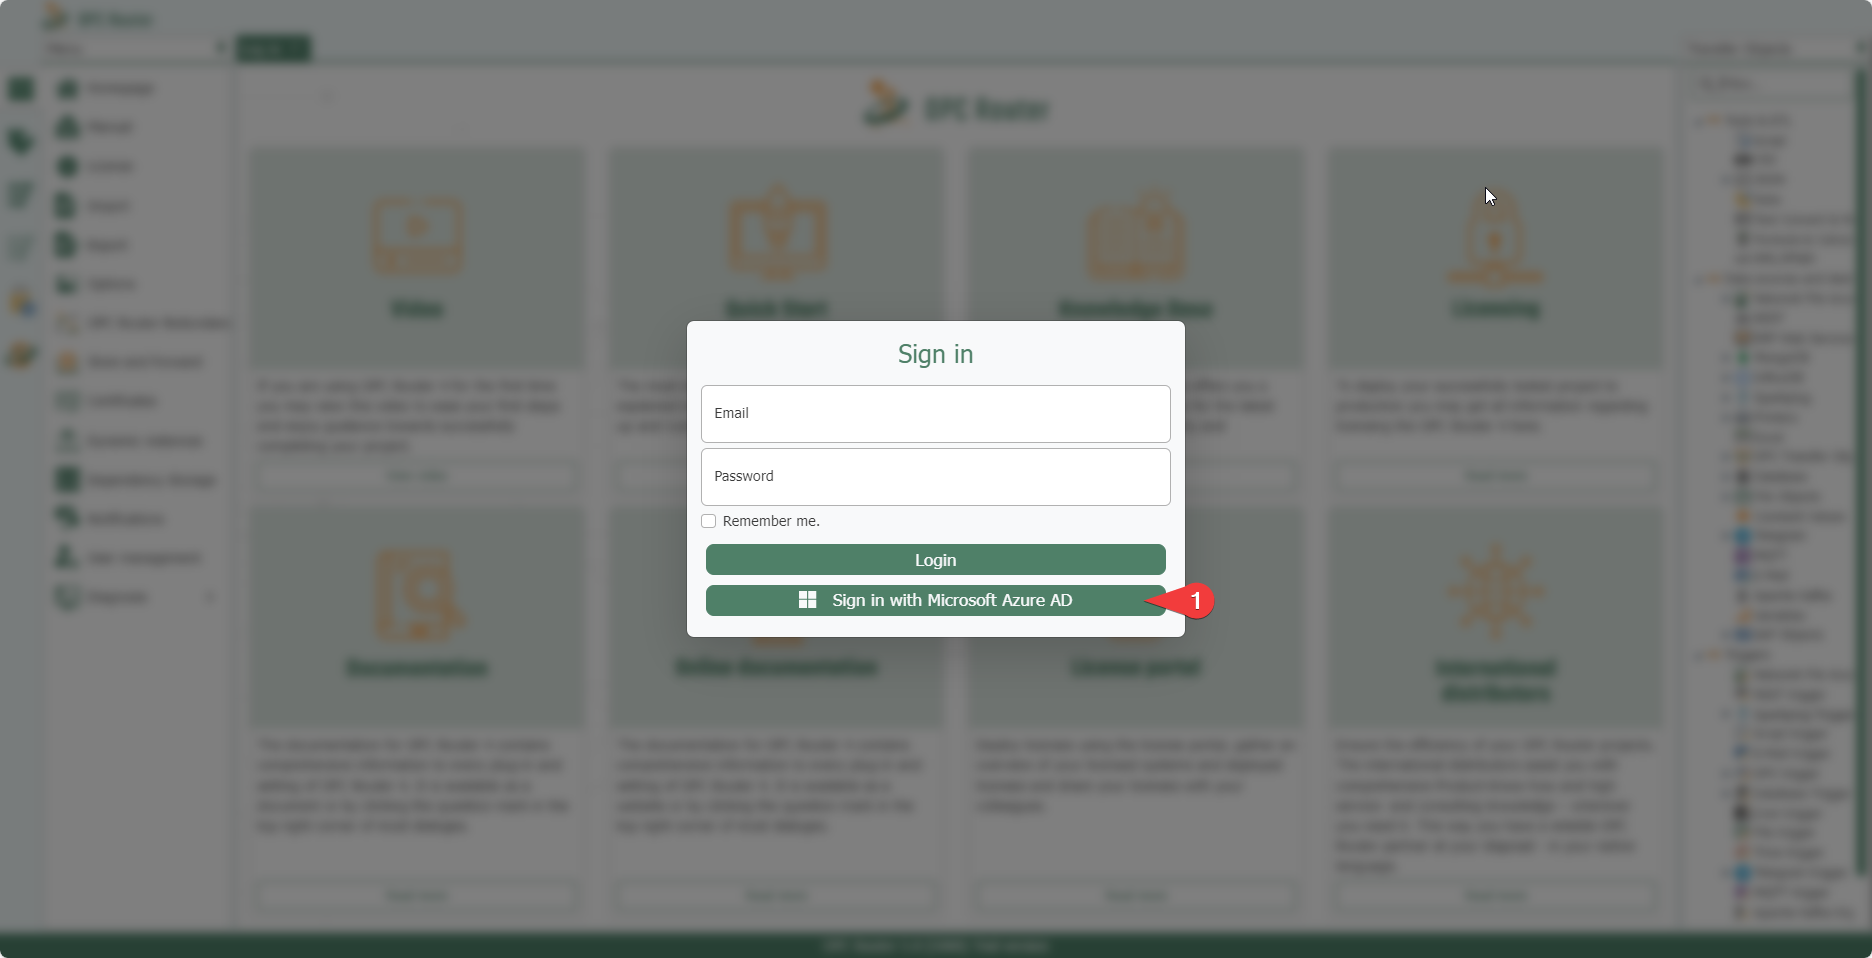
Once setup is complete, a button for logging in via Azure AD/Entra ID (1) should appear below the login button. Users who have been added via the Entra ID tenant can use this button to log in.
If the button does not appear
The button only appears once the Entra ID configuration is complete. Check the following in this order:
- Are all three variables set?
AZURE_AD_DOMAIN,AZURE_AD_TENANT_ID, andAZURE_AD_CLIENT_IDmust be passed to the container. You can usedocker inspectto check which environment variables the container actually received. - Is Web Management running over HTTPS? Login via Entra ID is not possible without HTTPS.
If the button appears but the sign-in process results in a Microsoft error page, it is usually due to one of these two issues:
- The redirect URI does not match. It must match exactly the address used to access Web Management, including
https://, the port, and the endpoint path (/signin-oidcby default). Microsoft reports any discrepancy as a redirect URI error. - The checkbox for the ID token is not selected. Without the ID token enabled on the Authentication tab of the application registration, the OPC Router does not receive a usable response.